Appending Grayed-Out Overlays with jQuery and CSS
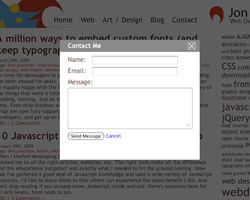
Grayed-out overlay example from jonraasch.com
Probably one of the most widely adopted “web 2.0” features is the grayed-out overlay. Rather than always redirecting users to a new page, overlays allow the current page to get “grayed out” with an overlaid panel. With the wide use of Javascript libraries like jQuery, the prevalence of these grayed-out overlays is understandable: they are very easy to build.
Building a Static Grayed-Out Overlay with CSS
Let’s start with the markup and CSS. We’ll need two wrappers, appended at the end of the DOM. Although we will append these later with jQuery, for now just put them right at the end of your HTML (or wait until we append them):
<div id="overlay">

    <div id="overlay-panel">

    </div>

</div>
The idea for these wrappers is that the first ‘overlay’ div will be the grayed-out background and the ‘overlay-panel’ will be the HTML panel that sits on top of the overlay.
Now let’s get started by styling the overlay. The first problem we’ll have to tackle is making the overlay fill the screen and sit on top of all the content:
#overlay {

    width: 100%;

    min-height: 100%;

    position: fixed;

    top: 0;

    left: 0;

}
Here we make the width and min-height of the overlay 100%, and also set fixed positioning.
However, you may have noticed that the min-height declaration of 100% isn’t yet working. That is because a percentage-based height property only fills up to a percent of the containing div. Since we already established that these will exist at the root of the body, we’ll only need to style two things:
html, body {

    height: 100%;

    width: 100%;

    margin: 0;

    padding: 0;

}
Make sure to set the height and width for both the HTML and the BODY. It may seem a bit redundant, but the concept here is that you need to stretch the entire window (HTML) as well as the document body (BODY). Now our 100% dimensions should be respected. However be careful about adding any margin or padding to the body or overlay div: due to the box model, margin or padding will combine with the 100% height / width to exceed the window size.
Next let’s add some more styling to our overlay. We’ll need to establish a background image, make sure that the overlay is at the top z-index and hide the overlay by default:
#overlay {

    width: 100%;

    min-height: 100%;

    position: fixed;

    top: 0;

    left: 0;

    z-index: 1000;

    background: url('../img/overlay.png') repeat 0 0;

    display: none;

    text-align: center;

}
Here we set the background image to overlay.png, which is a semi-transparent png 24. We also set the z-index to 1000, to hopefully establish the overlay as the top layer. Additionally, we set the display to none, because we want the overlay hidden by default. Finally we set the text-align property to center, because we will want to center the child panel using margin: auto like so:
#overlay-panel {

    margin: 10% auto 0 auto;

    width: 350px;

    background: #FFF;

}
The styling for the overlay panel is fairly straightforward. First the panel is centered horizontally using the ‘auto’ side margins and the static width. It’s also centered vertically a bit, with a top margin of 10%. We’re fudging the top margin here, if you need perfect vertical centering that can be handled with jQuery.
IE6 Overlay Issues Resolved
While we are mostly done with the CSS, certain aspects of this styling won’t work completely in IE6.
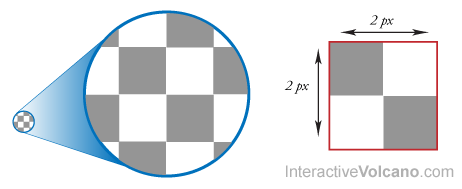
One IE6 problem we need to address is the png24 overlay image. Since this is a repeated background, methods for embedding the png24 in IE6 will fall short. So let’s use a PNG-8 here, but we don’t want to just use a flat gray background, we want some transparency. This can be accomplished with a 2px by 2px image, with an opaque gray pixel in the top left and bottom right corners, and a transparent pixel in the others:
Additionally we will need to handle a few more issues in IE6: the min-height and fixed positioning of overlay div. Since it is only a few styles, we can use a CSS selector hack, however feel free to use a browser conditional if you want to use best practices.
* html #overlay {

    background-image: url('../img/overlay-ie6.png');

    height: 100%;

    position: absolute;

}
Besides setting the alternate overlay image, we also address the min-height issue by converting it to a normal height. IE6 doesn’t respect min-height natively, but fortunately it also handles height incorrectly, and in basically the same way as it should handle min-height.
Furthermore, position: fixed isn’t respected by IE6, so we opt for the degraded position: absolute option. The only loss here is that in IE6 the overlay will not scroll with the page.
Appending the Overlay with jQuery (Finally)
After all that CSS, the jQuery portion of this script is a walk in the park. Basically we’ll need to first append the overlay divs to the DOM, and then create a function to show and hide the overlay.
For appending the overlay to the DOM, jQuery’s appendTo() method will work like a charm:
var $overlay_wrapper;

var $overlay_panel;


$(function() {

    $overlay_wrapper = $('').appendTo( $('BODY') );

});
A few things are going on here. First we define $overlay_wrapper and $overlay_panel variables, so they are at the top level of scope, and are essentially global. Next when the document loads, we append the div with the id “overlay” to the document body.
The appendTo() method works great here, because in one operation it both appends the item to the DOM and returns a reusable jQuery object. Next we can use the returned $overlay_wrapper object to append the overlay panel, and furthermore use that object to append any HTML we want contained within the panel:
var $overlay_wrapper;

var $overlay_panel;


$(function() {

    $overlay_wrapper = $('').appendTo( $('BODY') );

    $overlay_panel = $('').appendTo( $overlay_wrapper );


    $overlay_panel.html( 'Normal HTML Here' );

});
Now that our overlay has been appended we need to write functions to show and hide the overlay:
function show_overlay() {

    $overlay_wrapper.fadeIn(700);

}


function hide_overlay() {

    $overlay_wrapper.fadeOut(500);

}
These are simple enough, they just fade the $overlay_wrapper in and out. We can execute these functions however we like, for instance using a click event on all anchors with the class “show-overlay”:
$(function() {

    $('A.show-overlay').click( function(ev) {

        ev.preventDefault();


        show_overlay();

    });

});
Here we prevent the default action of the anchor tag and instead run our showOverlay() function.
Next, let’s make this script a little less obtrusive by only appending the overlay when show_overlay() is called:
var $overlay_wrapper;

var $overlay_panel;


function show_overlay() {

    if ( !$overlay_wrapper ) append_overlay();

    $overlay_wrapper.fadeIn(700);

}


function hide_overlay() {

    $overlay_wrapper.fadeOut(500);

}


function append_overlay() {

    $overlay_wrapper = $('').appendTo( $('BODY') );

    $overlay_panel = $('').appendTo( $overlay_wrapper );


    $overlay_panel.html( 'Normal HTML Here' );

}


$(function() {

    $('A.show-overlay').click( function(ev) {

        ev.preventDefault();

        show_overlay();

    });

});
Here we first moved the functions for appending the overlay into the append_overlay() function. Next, within show_overlay() we call this function to append the overlay if it doesn’t exist yet.
Finally, we will have to address the event for closing the overlay. Although we can attach the show_overlay() event once the document has loaded, the button for closing the overlay presumably exists within the overlay. Therefore we cannot attach this event until the overlay has been appended.
Let’s create a attach_overlay_events() function for this purpose, and call it after appending the overlay:
function attach_overlay_events() {

    $('A.hide-overlay', $overlay_wrapper).click( function(ev) {

        ev.preventDefault();

        hide_overlay();

    });

}


function append_overlay() {

    $overlay_wrapper = $('').appendTo( $('BODY') );

    $overlay_panel = $('').appendTo( $overlay_wrapper );


    $overlay_panel.html( 'Normal HTML Here' );


    attach_overlay_events();

}
And that’s it! Congratulations you’ve built your first Javascript 2.0 overlay!


Tags: cross-browser, CSS, dynamic, interactive, jQuery, unobtrusive, web design, web2.0
May 29th, 2009 at 12:31 pm
Nice post, thanks.
But i want to ask a question: Is it possible to send a value from example.html to “$overlay_panel.html”?(like a hidden value)
October 10th, 2009 at 1:10 pm
This works nicely, but there is one problem. When you download content to overlay panel using AJAX, function which adds click event for ‘close’ button (‘$(‘A.hide-overlay’, $overlay_wrapper).click) is called before AJAX return results. Because of that object ‘A.hide-overlay’ will not be found, and function for closing overlay will not be attached.
To make it work one can add:
$.ajaxSetup({async: false})
This will cause jQuery to wait with code execution till AJAX call is finished. (this is only of many ideas to make it work)
November 30th, 2009 at 2:46 am
A bit complicated for me, and no demo! Still, thanks for writing these!
December 11th, 2009 at 9:41 am
This works very nicely. I even managed to get it working in SharePoint which usually grumbles as soon as you even suggest using js!
May 3rd, 2010 at 2:56 pm
Thank you! And thank you Volvox – I’ve been searching for an answer to the overlay hiding problem for ages and you’ve sorted it – I was putting an alert() in there to try and slow the process but your idea is brilliant!
August 20th, 2010 at 1:28 pm
Very cool and easy to understand overlay, thanks. Unfortunately I can’t use it because it crashes IE6. Is there any known fix?
October 13th, 2010 at 4:55 am
This is OK for only one box. If I want to show-casing more than one box then, what we need to do? Pls reply…..
November 22nd, 2010 at 2:07 am
Hai i use following code for displaying overlay…
ths works well in Mozilla firefox but not in Google chrome…why??
Code here:
$overlay_wrapper = $(”).appendTo( $(‘BODY’) );
$overlay_panel = $(”).appendTo( $overlay_wrapper );
// $overlay_panel.html(‘Closer OverLay‘);
$(“#overlay-panel”).load(“overlay.html”);
May 11th, 2011 at 12:59 am
overlay script works nicely, but there is one problem. if i try to make it for multiple box and the functionality dynamic its not working correctly … any help?
January 8th, 2018 at 5:11 pm
Hi
How easy is it to frequently change the content of the $overlay_panel.html as I am looking to use this if there are multiple rows from a sql search request.
Thanks for the code, I am very grateful for all the code people put on websites for general use.
Regards
John Aves